

![[How to] Install & Use Selenium for Python with Vivaldi browser in Linux](https://cdn.hashnode.com/res/hashnode/image/upload/v1628126857501/YHo5thF7L.png?w=1600&h=840&fit=crop&crop=entropy&auto=compress,format&format=webp)


Selenium is a great framework for automating Web Browsers for testing purposes and many other uses , in this blog we'll learn how to find and install the correct version of Selenium with Vivaldi browser using two methods .
Install Selenium using pip
So the first thing we'll do is installing Selenium for python via pip, from your terminal run :
pip install --user selenium
pip is the package installer for Python, --user is used to install the package to your user home directory avoiding the need for root access (no sudo is needed) .
Selenium needs a WebDriver
Think of the WebDriver as a robot user that uses the browser (Just like a human user) it's the part responsible for talking to the browser and provides the language bindings for us to make it do different tasks on the browser . Now since there are different browsers types (Chrome , Firefox, ..) , there are different WebDrivers: Vivaldi is based on Chrome so we'll be using the WebDriver for Chrome that is : ChromeDriver . We need to install the correct version of ChromeDriver that matches our Vivaldi's Chromium version :
Finding Vivaldi's Chromium version:
Open Vivaldi and go to the about section menu > Help > About or open a new tab and past vivaldi://about/ , as you can see in the picture below Vivaldi 4.0 comes with Chromium 91

Getting ChromeDriver
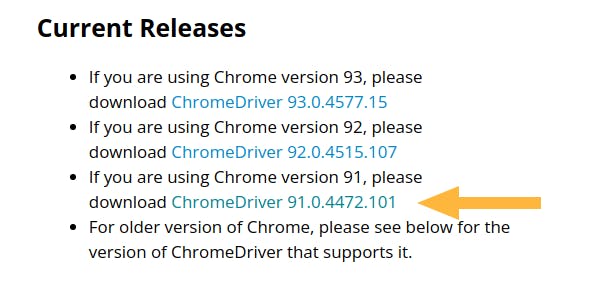
Method 1 : direct download
Open this page , and download the correct version , choose linux
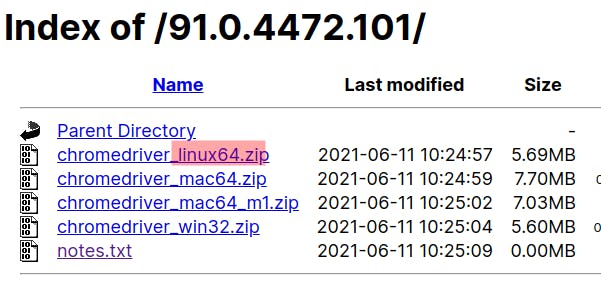 It'll contain a single file , extract it somewhere you can easily access , for e.g I extracted it in my home directory so its path would be :
 '/home/mossab/chromedriver'
Ready to try it !
I'll be using Python's Interactive Shell for demonstration:
from selenium import webdriver
The webdriver will need two information:
- Where is our custom browser (Vivaldi) : from terminal
which vivaldiwill show that Vivaldi's binary is in'/usr/bin/vivaldi'
- The path to the ChromeDriver:
'/home/mossab/chromedriver'Let's store them in variables :driverPATH = '/home/mossab/chromedriver' browserBIN = '/usr/bin/vivaldi'webdriver.ChromeOptionsas follows:
Finally we'll run the browser and control it via the driver object :options = webdriver.ChromeOptions() options.binary_location = browserBINdriver = webdriver.Chrome(driverPATH, options=options) # Get a webpage driver.get("https://en.wikipedia.org/wiki/Linux")
Method 2 : install the ChromeDriver with pip
if for some reason the first method didn't work , we can get the ChromeDriver using the pip package chromedriver-py , but first visit this page to find the exact version to install
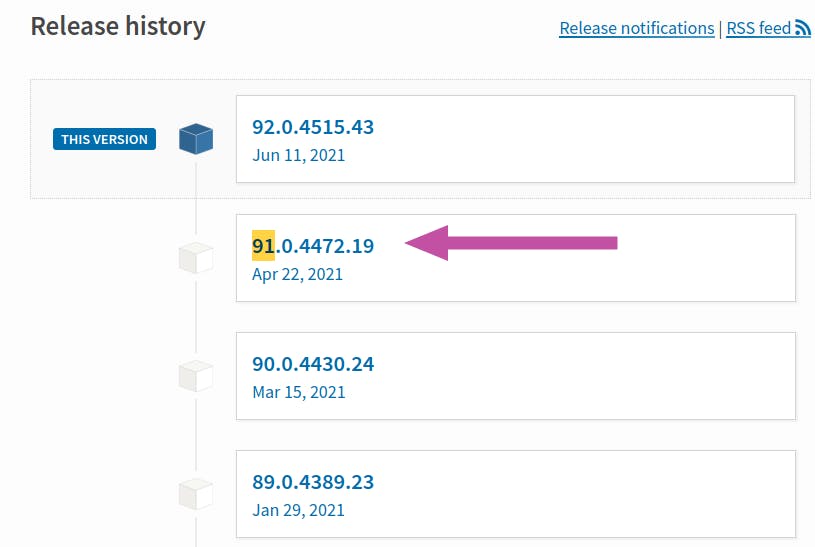
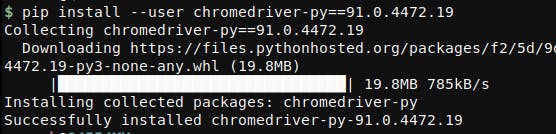
pip install --user chromedriver-py==91.0.4472.19
 Now instead of setting
 driverPATH manually , you can do the following :
import chromedriver_py
driverPATH =  chromedriver_py.binary_path
.. and complete the same steps as above .
Conclusion :
One last tip : if when trying to open a url you face a selenium.common.exceptions.InvalidArgumentException make sure you're using the full url with the http protocol that is: "https://www.google.com" instead of "www.google.com" .
Phew ! That concludes the tutorial , if it was useful please Like and Share , didn't understand a step ? I made a mistake ? please let me know in the comments below or reach me on twitter !
Happy automating 🤖 and stay away from CAPTCHAs !